Post by sickscore on Aug 23, 2017 22:32:32 GMT
INVENTORY PRO 2.5.x
= Invector Melee [>2.2] | Invector Shooter [>1.1] =
Hey guys,
I finally finished the Inventory Pro integration which I have been working on for quite some time.
I already tested most things, but due to it's complexity, there is enough space for potential errors.
Please report any issues you find, so I'm able to upload a fixed version ASAP!
Cheers, sickscore
I finally finished the Inventory Pro integration which I have been working on for quite some time.
I already tested most things, but due to it's complexity, there is enough space for potential errors.
Please report any issues you find, so I'm able to upload a fixed version ASAP!
Cheers, sickscore
DOWNLOAD:
Download unitypackage -> DOWNLOAD
IMPORTANT:
- Always use an empty project for testing purposes! I'm not responsible for damaged projects...
- Don't add the Invector Inventory/ItemManager, you will not need them!
- If you've enabled the shooter integration, don't disable it later! You will lose all shooter items you created!
- Never press the "Position now" button within the item settings, or you will get a console full of error messages. Haven't found a way yet to disable the button without modifying the Inventory Pro core files.
INSTRUCTIONS:
- Create new project! Don't test this in an existing project! (I used Unity 2017.1.0f3)
- Import Invector Melee/Shooter & Inventory Pro (I used Shooter v1.1.1 and InventoryPro 2.5.5)
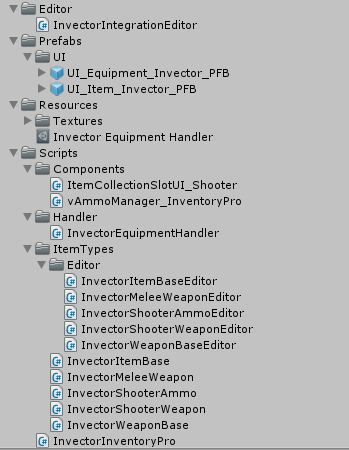
- Import Integration (all files!)
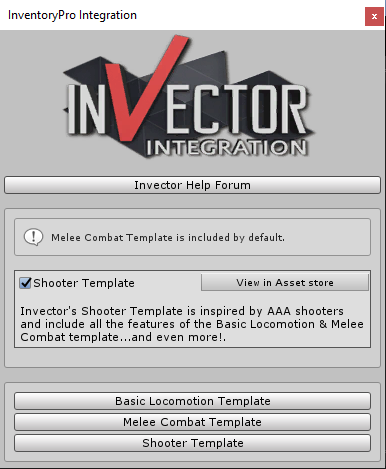
- If you owe the shooter template, than go to "Invector > Integrations > Inventory Pro" and enable the "Shooter Template"
- Create empty folder for your Inventory Pro database and items
- Go to "Tools > Inventory Pro > Easy Setup" and follow the steps:
- Add all managers
- Generate all databases (select the empty folder you created)
- Generate Canvas (UI)
- Link all UI references
- Check issue detector & fix any issues! Check with green "Force rescan" button
-> Sometimes you need to manually assign the localization database (from your database folder!)
- In your project view, right click on your database folder and select "Create > Inventory Pro > Invector Equipment Handler"
- Go to "Tools > Inventory Pro > Main Editor" and open the "Settings Editor". Specify the database path, so the path has no error color anymore
- Go to "Equipment Editor" and create 3 Equipment Types and assign the Invector Equipment Handler:
- "LeftHand", Restrictions: "RightHand_Shooter"
- "RightHand", Restrictions: "RightHand_Shooter"
- "RightHand_Shooter", Restrictions: "LeftHand" & "RightHand"
- Go to "Items Editor", open the tab "Item Rarity Editor" and create a new Item Rarity "Default" (I used a gray color)
- Open "Item Category Editor" tab and create your Item Categories. (I used: "Consumables", "Melee Weapons", "Shooter Weapons" & "Ammo")
- Open tab "Item Editor" and create your items! DON'T PRESS "POSITION NOW" BUTTON!
InvectorMeleeWeapon:
- Select a prefab which has a vMeleeWeapon component!
- Assign your Equipment Type ("RightHand" for Weapons, "LeftHand" for Shields)
- Assign your Rarity and Category
- Set the EquipID and EquipDelay (same values as you would use in the vItemManager)
InvectorShooterWeapon:
- Select a prefab which has a vShooterWeapon (and optional a vMeleeWeapon) component!
- Assign your Equipment Type ("RightHand_Shooter")
- Assign your Rarity and Category
- Set the EquipID and EquipDelay (same values as you would use in the vItemManager)
- Set the AmmoID (must be unique!)
InvectorShooterAmmo:
- Select "None" as model (you only need a model if you enable "Is Droppable", then use the "Override Drop Object Prefab")
- Assign your Rarity and Category
- Set the Ammo ID (same as you used on your weapon!)
- Create your ThirdPersonController (Melee/Shooter)
- (Shooter) Replace the default "vAmmoManager" component with the one in the integration folder "Scripts > Player > vAmmoManager_InventoryPro"
- Add the "Inventory Player" component from Inventory Pro and assign the default Equipment Handler ("Character Equipment Handler")
- Create your Inventory Window and Character UI as shown in the linked tutorial videos from Devdog. Create minimum 3 equipment slots for your Character UI (LeftHand, RightHand, RightHand_Shooter) and assign the individual type on the "Equippable Slot" component.
- Use the "UI_Item_Invector_PFB" prefab for your Inventory window and the "UI_Equipment_Invector_PFB" prefab for your Character UI
- After you've created your inventory and your 3 (or more) character equipment slots within your Character UI, go to your player gameobject and assign the Inventory Collection and the Character UI to the "Inventory Player" component.
- Press the "Force rescan" button, you should see your equipment slots
- Create a equip transform as child of your player hands for each equipment binding (I copied the defaultEquipPoints from an Invector demo scene) and assign it to the corresponding "EquipTransform". You don't need to assign the "Root Bone".
- For testing purposes you can add a "Collection Populator" component to your inventory and assign some starting weapons